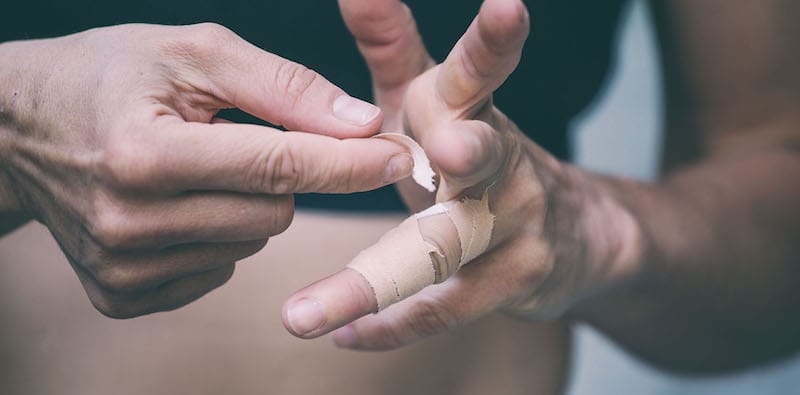
Today we’re going to show you absolutely everything you need to know about taping your fingers for rock climbing.
(In fact)
This article is the result of countless hours of painstaking research, field testing, oh and not to mention decades of collective climbing experience.
Rest assured, if you have any questions about taping your hand for rock climbing, you’re in the right place.
Hey! By the way… this page contains affiliate links. So if you make a purchase after clicking one at no cost to you we may earn a small commission. Thanks for your support!
Why Do Rock Climbers Tape Their Fingers?
Finger tape is used by climbers for two purposes: either to substitute a protective layer above your skin, or to support injured soft tissue such as pulleys and tendons. The most common reasons to tape your fingers as a climber are:
- A finger pulley injury
- Raw or split finger-tips
- Flappers
- To protect your skin on very sharp rock, usually while warming up or working moves
Chances are that throughout your life as a climber, you will encounter at least a few of these reasons to tape up. That’s why we’ve prepared this ultimate guide to finger taping for when that inevitable time comes.
Taping Fingers for Finger Pulley Injuries
(Taping for A2 pulley ruptures, ring finger pulley injuries, partial ruptures and more)
*Whip-crack*
The sound rang out through the forest like two successive gunshots. My partner instantly dropped off the boulder. I looked furtively at the rock, hoping to see the scar of a broken hold. No dice. A sinking feeling hit me; the human body is not supposed to make those sorts of sounds. The obvious culprit was a sudden pulley or tendon rupture, and after some quick consolation I ran off looking for snow to pack around my partner’s finger.
That right there is the sort of unfortunate experience that usually precedes learning more than one ever wanted to know about finger taping.
Sure, ripped skin is a downer, but your split tip will be gone next week while a damaged pulley will have you taping up for months.
So, firstly, it’s important to understand what you’ll be taping and why.
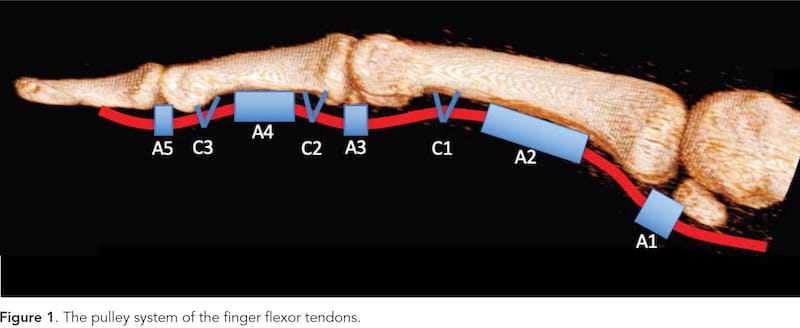
The most common climbing injury that your fingers might encounter – apart from getting scratched up – is an annular (“A”) pulley injury.
Basically, the annular pulleys are a series of ring-like soft tissues that hold your tendon to the bone. They’re used in flexion and application of force – so basically in any pulling action when climbing, and particularly when crimping.
You also have a series of cruciate (“C”) pulleys, shaped like crosses, that help keep your A pulleys into the tendons during finger flexion; however, these are far less commonly injured.
If you’re taping for a pulley injury, your goal is to help your pulley system keep the tendons close to the bone, giving it a little extra support, or even preventing flexion entirely in the early stages of injury.
Simply put, the main goals of finger taping for pulley injuries are:
- Extra support for injured pulleys in recovery – reducing load
- Immobilising finger joints to prevent bending
- Psychological reminder that you are injured or have been in the past
Taping to Reduce Load on Finger Pulleys
First up, taping will not prevent injury. Taping should be used while you’re recovering from injury, acting as a little extra support while you regain full strength in your pulley.
Research suggests that preventative taping of healthy fingers is a bad idea. It will not provide any meaningful level of support to healthy pulleys (Schweizer, 2000).
Worse, it may actually lead to injury, as your pulleys may not get the proper stress they need to continue strengthening and keep pace with your muscle growth throughout your training.
If you’re recovering from an injury and want to continue climbing, it’s important that you use the correct taping method. And research shows that H-taping provides the most substantial support to your pulley in keeping the tendons close to the bone.
The fact is, an injury to your A pulleys will cause your finger tendons to bowstring away from the bone, and the idea of taping is to provide the pulleys support in holding the tendons close to the bone and preventing bowstringing.

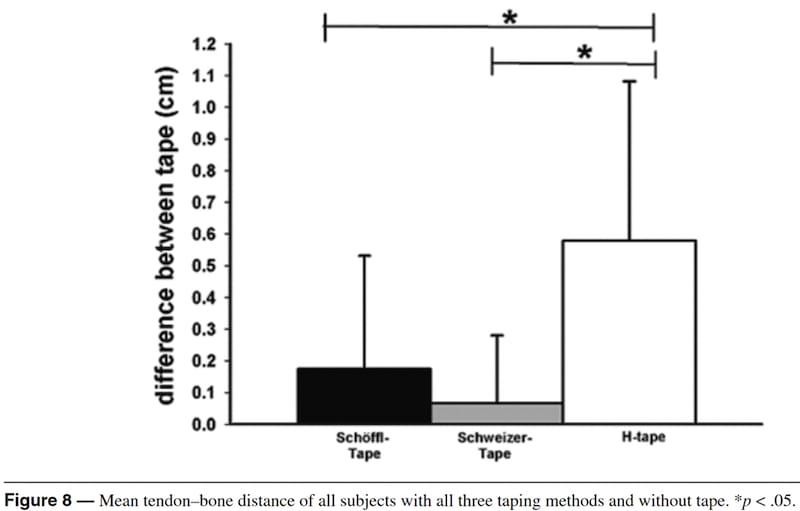
The above graph comes from research by Doctor Isabelle Schöffl and colleagues (2007), experts in hand pulleys and climbing injuries. Their research compared the effects of three taping methods to determine their effectiveness in keeping tendons close to the bone (ie. preventing bowstringing).
Healthy pulleys work to keep your tendons close to the bone whilst climbing, and these taping methods are intended to support injured pulleys in doing their job, and also prevent worsening their ruptures.
The taping methods tested were:
- Schöffl taping (also known as X or 8 taping)
- Schweizer taping (also known as circular or ring taping)
- H-taping
Doctors Isabelle and Viktor Schöffl had originally pioneered the x-tape/8-tape method of pulley taping; this is why it is also referred to as Schöffl taping.
However, further research led them to develop the H-taping method. Schöffl and her colleagues’ research shows that H-taping is far more effective than either of the other two methods in keeping tendons close to the bone and supporting the job of injured finger pulleys while flexed and under pressure (ie. when crimping).
The same experiment also tested the impact of tape in injured fingers’ crimping strength, and found that H-taping increased the crimping strength of injured fingers by an average of 13%.
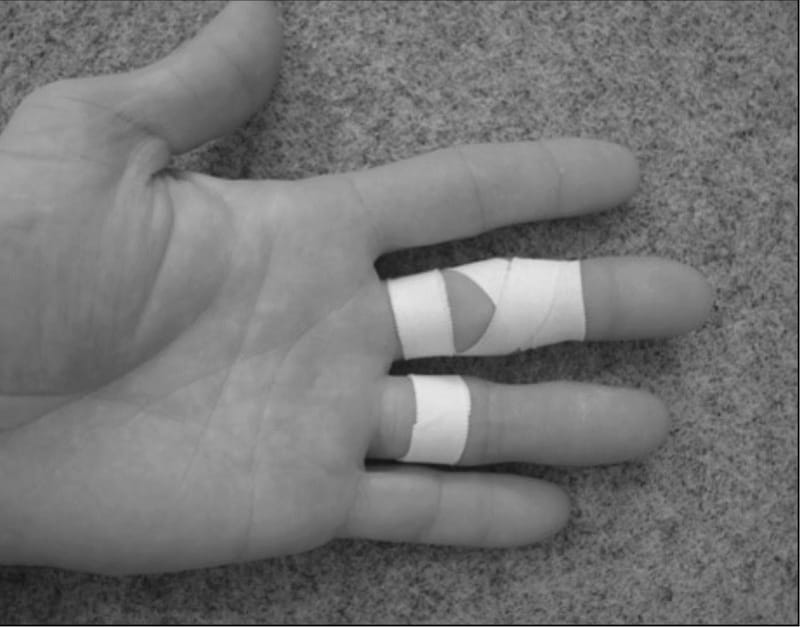
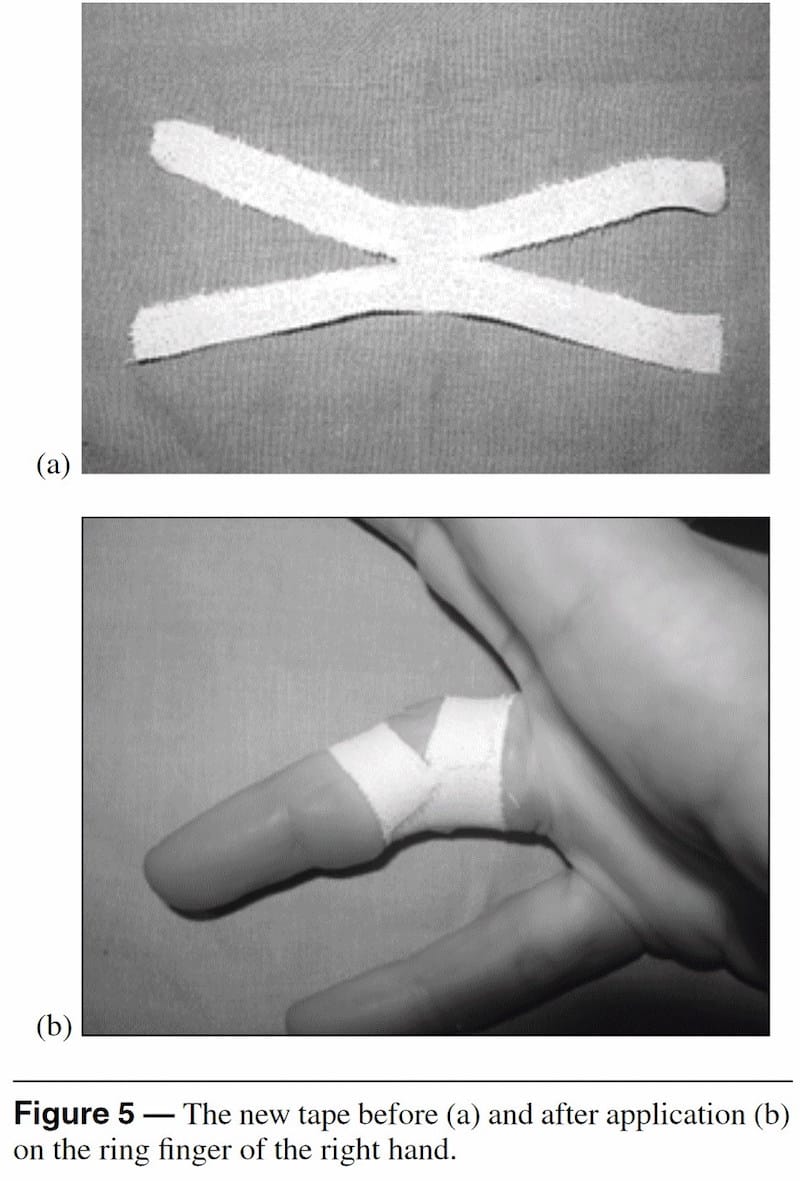
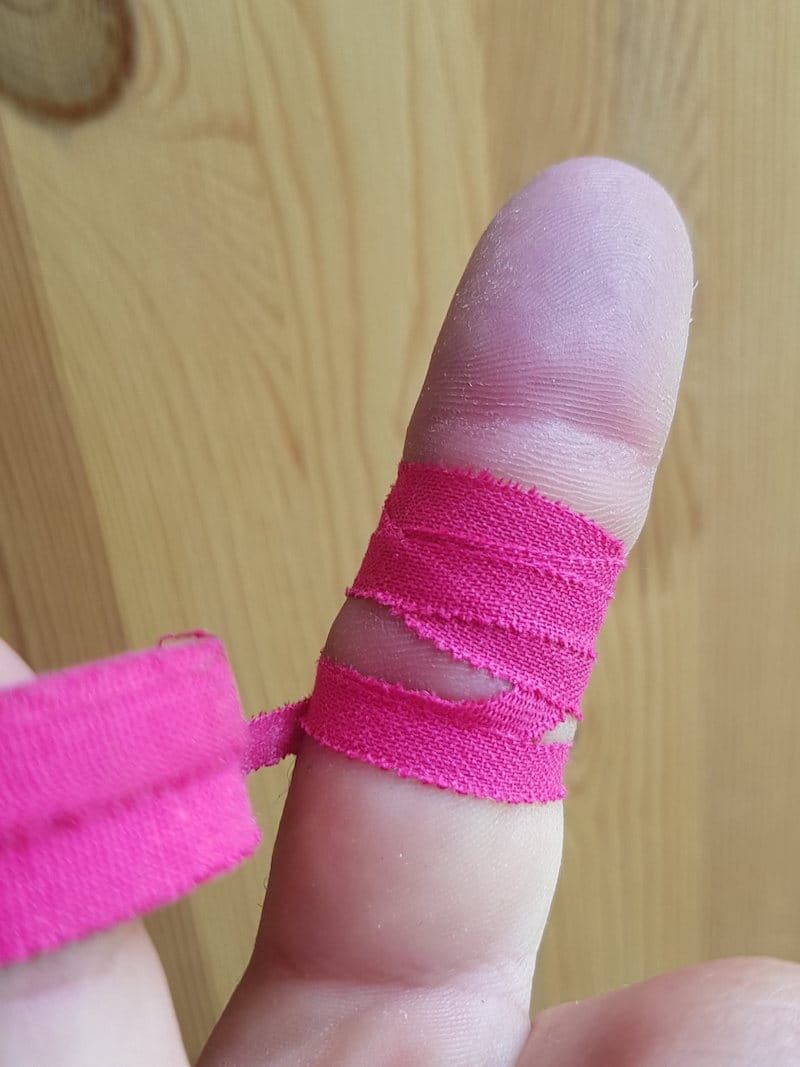
Doctor Schöffl’s instructions for H-taping are:
- Cut a length of rigid athletic tape 10cm long and 1.5cm wide. The researchers preferred Leukoplast brand tape.
- Cut the tape in half lengthwise from both ends, leaving a bridge of 1cm in the middle.
- Place the tape on the injured finger with the bridge on the inside of the finger, sitting on the crease of the joint on the upper end of the injured pulley.
- Flex your finger 60° at the joint being taped. Wrap the upper bit of the tape in a ring. Then wrap the other ring of tape below the joint.

- Leukotape P is specifically designed for the patellofemoral (McConnell) taping
- High tensile strength yet hand tearable for easy application
- Rigid joint immobilization and limitation of movement
- Protects skin from scratches and rubbing
You can also see Doctor Volker Schöffl, the other half of the husband-and-wife team of climbing injury experts, demonstrating this taping method by video:
When using this taping method, it’s important to retape between each route. Tape stretches quickly, and the support you initially gained from taping will probably disappear by the time it has stretched out across a route-worth of climbing.
Taping to Immobilise Fingers (‘Cause You Can’t Hurt It Worse If You Don’t Use It)
Not all climbing injury experts agree with the Schöffls’ ideas. In particular, Doctor Julian Saunders argues that it’s more important to allow your finger to heal than to try to gain some marginal benefits through taping and trying to climb normally.
Saunders believes that, apart from its use as a reminder, tape’s main role should be to intentionally restrict movement of the finger at the joint of the injured pulley(s). If you can’t bend it, you probably won’t be able to make it any worse.
Saunders’ instructions for taping are:
To be effective, correct taping of A2 and A3 pullies must result in restricting the ability of the finger to bend in the middle. To apply the correct technique, first note that there are three creases on the front of each finger, the first being at the bottom.
With your finger straight, tape from half way between the first two and finish half way between the second and third, overlapping the tape 50%. You will quickly realize that your capacity to crimp is zero. Perfect. It will be great for your climbing. (Saunders, n.d.)
With this taping method, the same proviso applies as for H-taping: the longer you climb with the tape on, the looser the tape will become and the less effective the taping will be.
Remember to retape your injured digit between climbs or whenever you feel the tape slackening.
Buddy Taping Fingers
Oh, I get by with a little help from my friends
Mm, I get high[er] with a little help from my friends
Oh, I’m gonna try with a little help from my friends
-The Beatles, 1967.
Alright, this might seem random, but many people seem to have taken these lyrics from The Beatles to heart when dealing with their finger injuries.
Blown a pulley in your finger? No worries, tape him to his neighbour and they can buddy up and help each other out, sharing the load.
Only, in reality, you’re already squeezing the maximum number of fingers possible onto each hold, so they’re already working together. Your finger’s buddy isn’t going to hold up his bowstringing tendons.
Be a buddy to your injured finger and stick to H-taping, taping for immobilisation, or just giving him some rest.
Tape as a Psychological Tool
Chances are that if you’re climbing while injured and you pull too hard on your injured finger, you’re going to make your injury worse.
The advice from many doctors will be to stop climbing whilst injured, advice which you almost certainly won’t want to follow. Therefore, tape can be an important reminder that you are injured and that you should not ask too much of your finger.
In this case, any taping method will do – your tape is sitting there just as a visible reminder. Every time you reach up to grab that upcoming crimp, you should see the tape and consider the impact your movement is about to have on your ongoing state of injury.
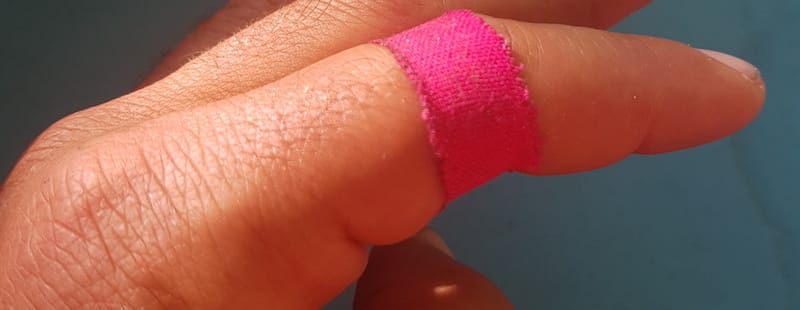
You might also see this sort of psychological taping on the fingers of climbers who have recovered from injury, which they keep on doing as a reminder to consider their choices and their potential for injury.
Do you really need to full death crimp that next hold, or can you position yourself a bit differently and take it open handed? A simple ring of tape around your formerly injured finger can help remind you of the importance of climbing in a way that keeps your fingers healthy.
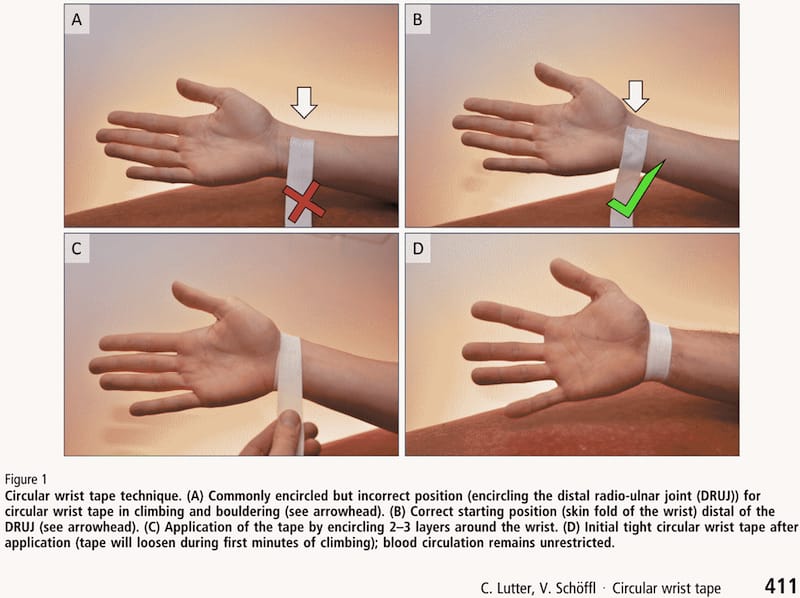
Taping Wrists for Climbing
First thing’s first – taping your wrists will not make them stronger (Retting et al., 1997, and Takahashi et al., 2014, as cited in Lutter & Schöffl, 2017).
In fact, it might make them weaker. And taping as a hedge against injury, when not actually necessary, might even make your wrists weaker and increase your injury potential.
Are you feeling wrist pain when you climb on underclings, gastons, slopers or any other hold type where you need to apply force while bending your wrist? If you’ve sustained a wrist injury and been told by a medical professional that you’re okay to climb, but that climbing is causing you pain, then taping may be able to help you.
Research has found that correctly taping may reduce your pain; but bear in mind that because you’ll need to tape tightly to have any benefit, you may just be trading one discomfort for another.
Instructions:
- To tape your wrist, you’ll need a 1” wide strip of rigid athletic tape like Leukotape P
- Tape at the skin fold of your wrist, wrapping the tape 2-3 times around the wrist in a band.
- Tape as tightly as you can without cutting off your blood flow or losing flexibility. Don’t worry if the tape initially feels a bit tight, as it will loosen within the first minutes of climbing.
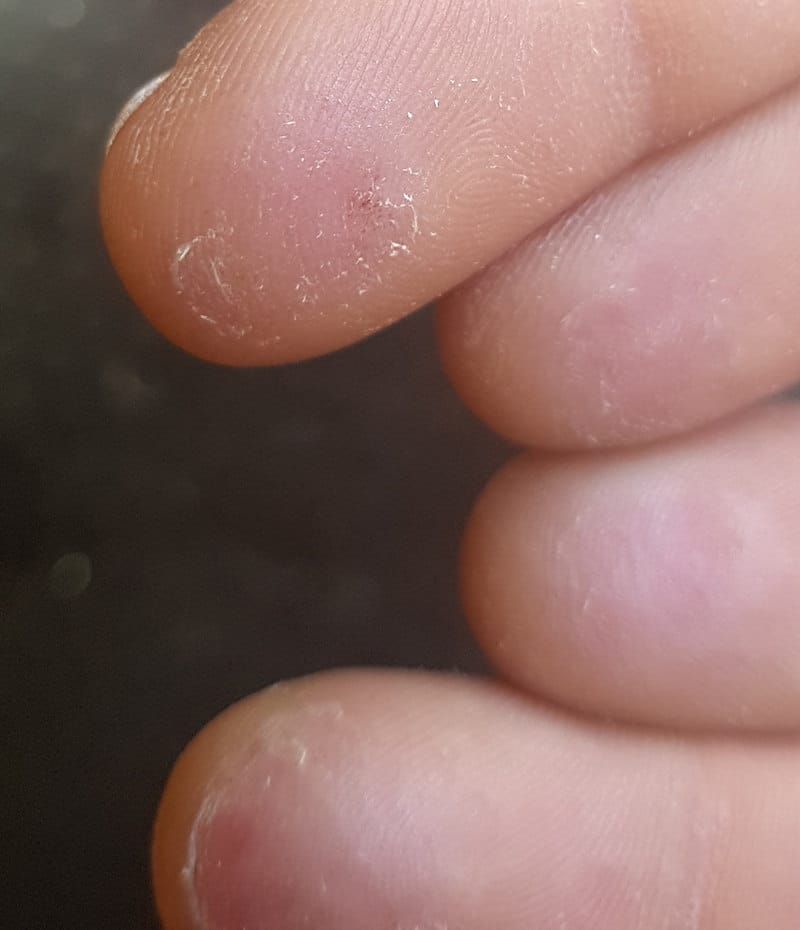
Taping for Split Tips, Flappers and Worn Skin
Whew, now that we’re done dealing with the serious stuff, we can move onto the most common reason that is likely to lead you to tape up – raw fingers and split tips.
Although these injuries are far from serious, they can seriously mess up your climbing plans for the rest of the session and upcoming days. This section is especially relevant to boulderers, because limit climbing on tiny edges and sandy slopers all day is guaranteed to wear through your skin fast.
For taping raw and cut skin, Leukotape P is a popular choice. Metolius finger tape is also excellent, and can be found at most climbing shops.
Most fabric based athletic tapes will do the job in a pinch, but tape up enough times and you’ll find that some definitely work better than others for climbing.
Taping Split Tips and Raw Fingers
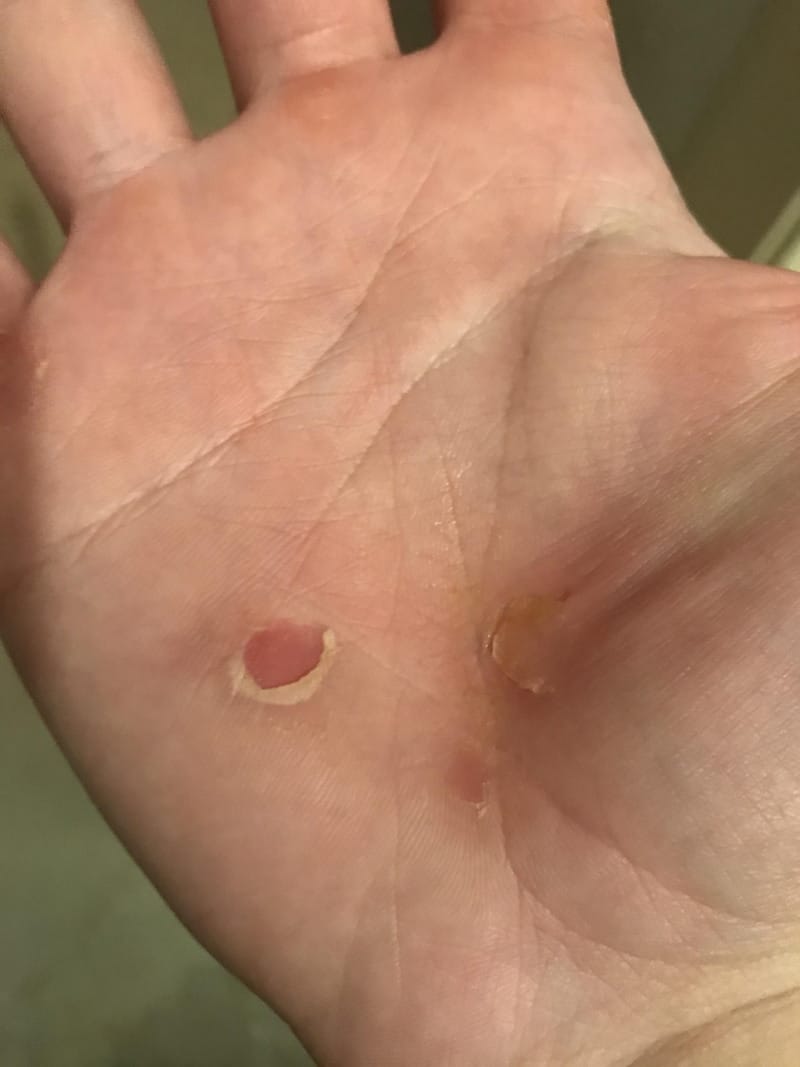
Bear down too many times on the same razor crimp and there’s a chance you’ll find it’s cut a perfect horizontal trace across your finger – the climber’s equivalent to a paper cut.
Although this injury is tiny and harmless, it’ll probably cut your climbing session short now that you’re howling each time you try to pull on.
Equally, too many days on will just grind your skin down until your tips are raw. You might not be bleeding, but everything just kind of hurts to pull on.
The sensible thing to do at this point would be to take a few days off and let it heal, or to protectively tape it and switch to a less skin-intensive style of climbing for the next few days.
However, if you really want to get in a few more burns on your project or make the most of the last few days of your trip, then the method below is the best way to tape it up.
Climbing won’t quite feel the same – you’ve now got a layer of tape between your fingertip and the rock – but at least you’ll be able to climb.
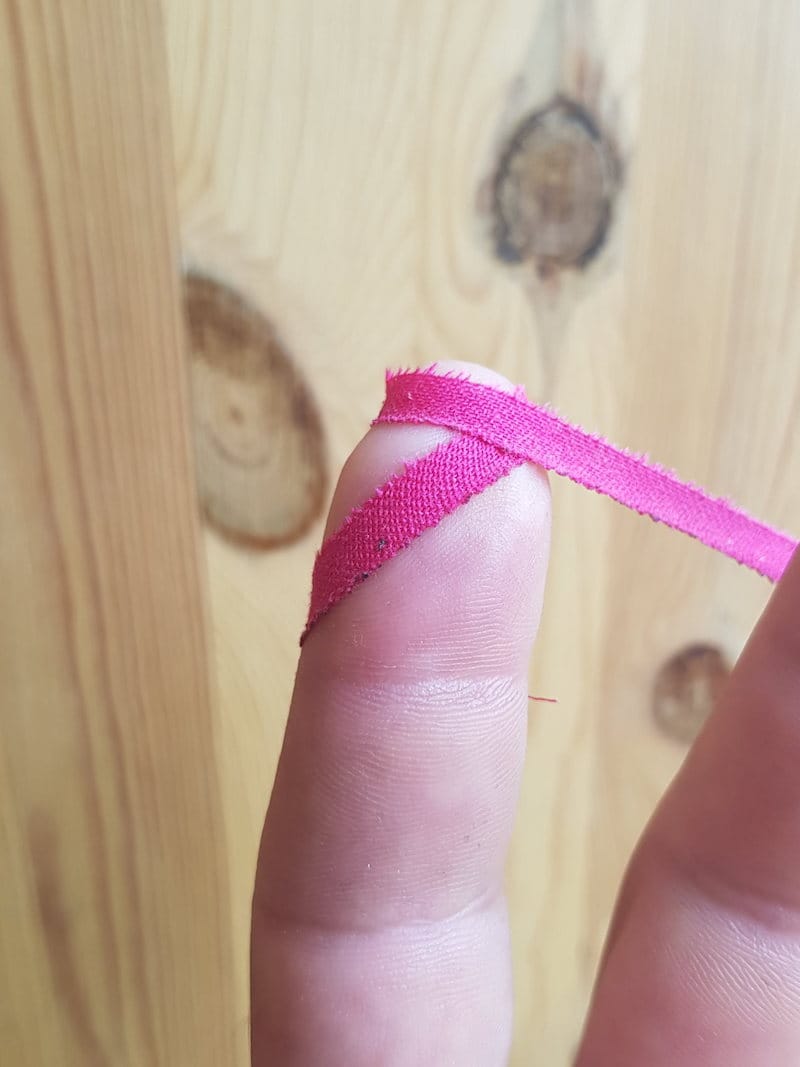
Instructions:
- Cut a thin width of your favourite finger tape down the side of the roll, about ¼”.
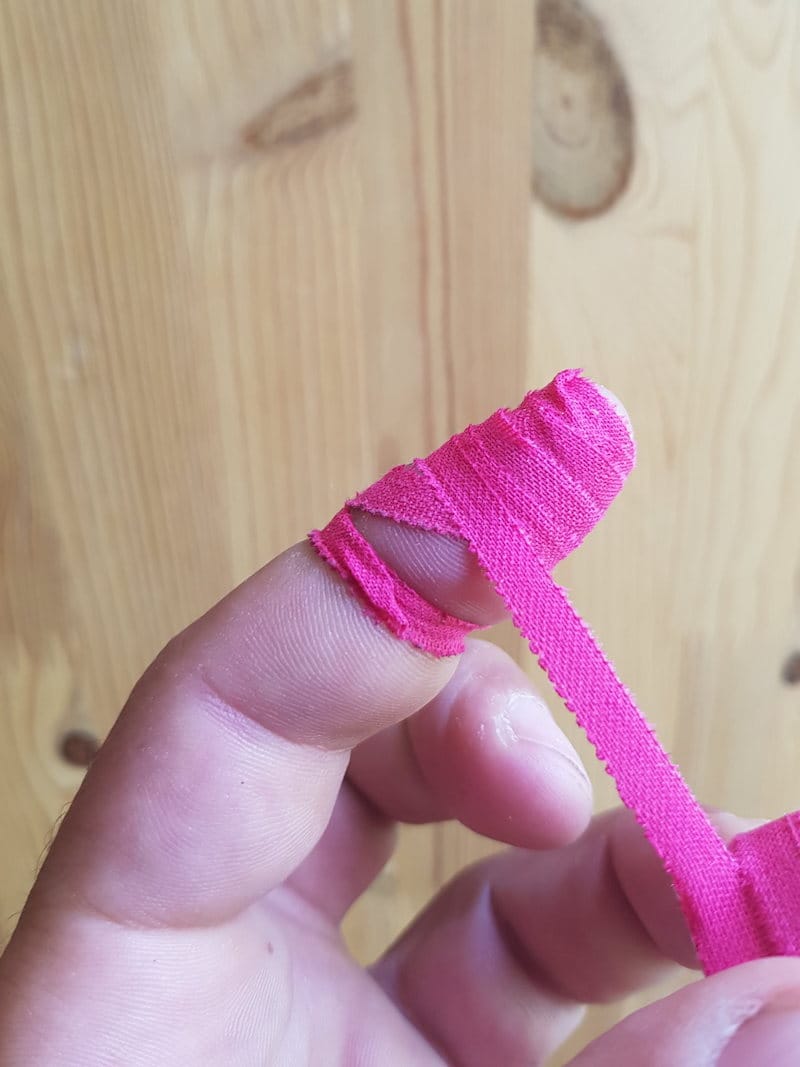
- Run the tape from your second finger joint, up over your split tip and back down again to the second joint on the other side. Tie a band around the joint.

- Bend your finger slightly at the first joint. Run the tape back up to the tip. Beginning at the fingertip, wrap the tape around your finger in layers that slightly overlap and go progressively lower down your finger until you reach your first finger joint. Tape fairly tightly, as the tape will loosen up quickly while climbing, but not so tightly that you feel your blood flow is restricted.
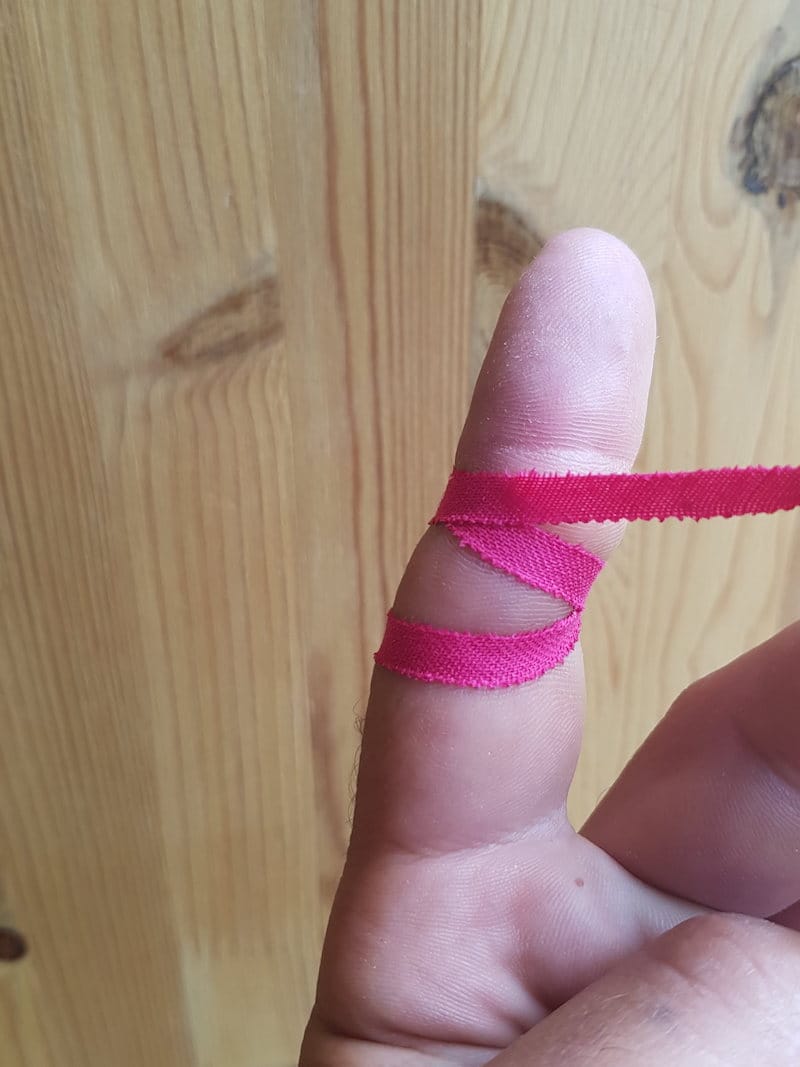
- Set the tape in place by wrapping a figure 8 of tape around the joint.
- Finish with a few quick wraps around your second finger joint to ensure the tape stays in place.
Here, you can watch climbing legend Beth Rodden guide you through the steps of taping for a split tip:
Taping Flappers
Spend time working a dyno, hanging around in pockets or even just cranking up too many jugs, and you’ll eventually encounter the notorious flapper.
These guys look gross and feel like they will never heal – probably made worse because you won’t let a pesky little flap of skin stop you from climbing.
If you rip open a flapper, before anything, you should wash it out thoroughly with some water and a bit of antiseptic. Infection will only slow the healing.
Now, before taping, you have a choice: either cut off the flap of skin that was formerly a part of your finger, or to try to keep it on.
If you choose to cut it off, make sure you do a clean job and file or trim any remaining loose skin that could get snagged and continue the rip. Personally, I prefer to keep it on to provide a bit of cushioning for the raw skin underneath.
If you choose to keep the flapper on, you’ll now need to decide whether you want to superglue it in place or whether you’ll just treat it with care.
Cyanoacrylates (“superglue”) are commonly used in surgery and dentistry, with the major difference being that medical glues bond more slowly to avoid burning the skin on contact (Davis & Derlet, 2013). Although whether or not superglue is toxic is still a subject of research and discussion, the popularity of cyanoacrylates in medicine and dentistry suggests that the dab of glue you’re putting on your finger is probably fine (Leggat et al., 2004).
Supergluing it back into position as neatly as possible will reduce the pain of continued climbing, reduce the probability of infection, and reduce the chance of worsening the damage by accidentally ripping it off further mid-climb. But it will definitely burn to apply.
Once your wound is clean – and after the glue has dried, if you chose to use it – you can start taping. The following instructions are for taping finger flappers. If your flapper is on your palm, you’ll need to make a gymnastics grip, as explained a little further below.
How to tape a flapper:
- Cut a thin width of your favourite finger tape down the side of the roll, about ¼”.
- Start by setting an anchor on the joint below the flapper. Now wind the tape back up to the start of your flapper.
- Work your way down from the hinge of the flapper if you’ve chosen to keep it on.
- Tape over the flapper in an overlapping “X” pattern, gradually working your way down the finger joint until the flapper is covered. Tape tightly, but not so tightly that you cut off your circulation.
- Set the tape in place by doing a couple of quick circular wraps below the joint of the section of the finger where the flapper is located.
Pre-emptive Taping to Protect Your Skin
Occasionally, you might find yourself on a project that just eats finger skin. In this case, it can be sensible to pre-emptively tape your fingers while working the moves, so as not to waste precious skin before your sending attempts.
This will alter the feel of the climbing and reduce your ability to use holds to their best potential, but it can be a good option if you have a limited amount of time in an area and you’re dead set on working a route that is skin intensive.
In this case, you should use the split tip taping method explained earlier.
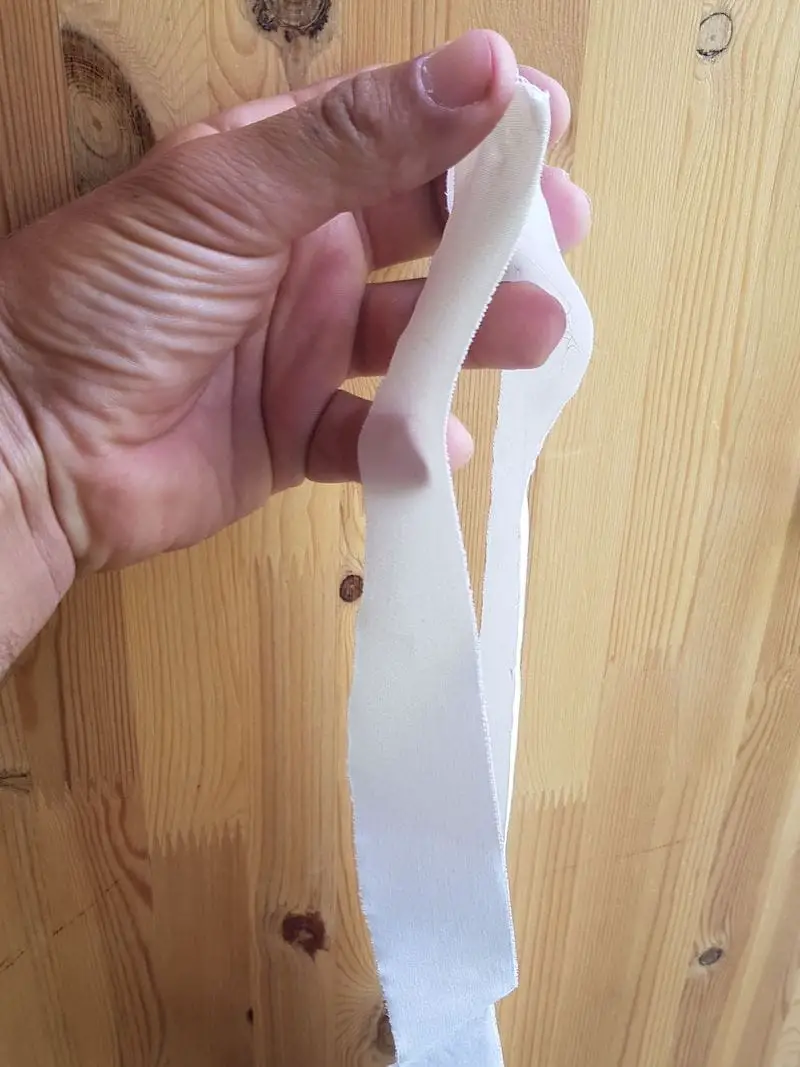
Taping Hands for Crack Climbing (How to Make Crack Gloves)
Whether you’re about to take your first steps into crack climbing or a seasoned jammer, it’s important to know how to make crack gloves.
Crack gloves are the subject of a lot of discussion, and many climbers often feel like they’re making a statement of their skill by choosing not to wear them.
Thing is, crack gloves are often said to be an “aid”, making crack climbing easier by making your hand bigger to better fit larger crack sizes, providing extra grip (particularly with rubber-backed commercial models), or just because they reduce the pain of jamming on rough rock.
Experienced crack climbers will often say that jamming doesn’t hurt, nor ruin the skin on the back of your hands, once you’ve mastered the techniques.
Me? I’ve done a lot of jamming. I’m equally comfortable on a flaring hand jam or a fingerlock as on a good jug. I’ll often go without gloves if it’s only a weekend trip and the rock is smooth. But if the rock is very rough, or wet, or I’m planning to spend more than a couple of days crack climbing, crack gloves are essential.
Unless you’re living full time at a crack-climbing Mecca like Indian Creek or Yosemite, chances are that the back of your hand isn’t getting much chance to build up the calluses you’ll need for that crack climbing trip you’ve got lined up.
And it sucks jamming with bleeding sores – gobies – lining the back of your hand. Better learn to make crack gloves, then!
Before making your gloves, it’s worth considering a few things:
- How wide will the cracks be that you’re jamming? Use too many layers of tape and your gloves, though comfortable, probably won’t fit into your thin hands green Camalot project.
- Is the climb you’re about to do pure jamming, or will you need to pull on crimps and jugs as well? The bulkier your gloves, the harder it can be to use non-crack holds. The same goes for some taping methods, which although quick, can restrict hand mobility for non-crack holds.
When making gloves, the first important point is to use the right tape.
Ideally, you’ll want a tape that’s very sticky and abrasion resistant. Most fabric based athletic tapes will do the job, but just like with finger taping, some tapes work noticeably better than others.
Two popular choices are Mueller’s Euro Tape and Metolius Climbing Tape.

Of the many taping methods out there for making crack gloves, our preferred way is the one that Metolius teaches. It makes a reliable glove that is reusable, and provides plenty of mobility for your fingers and palm for routes that require a mixture of climbing styles.
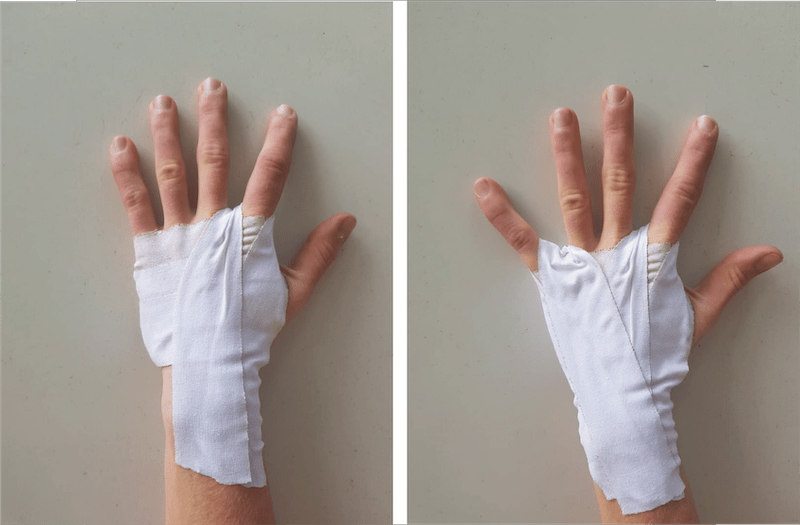
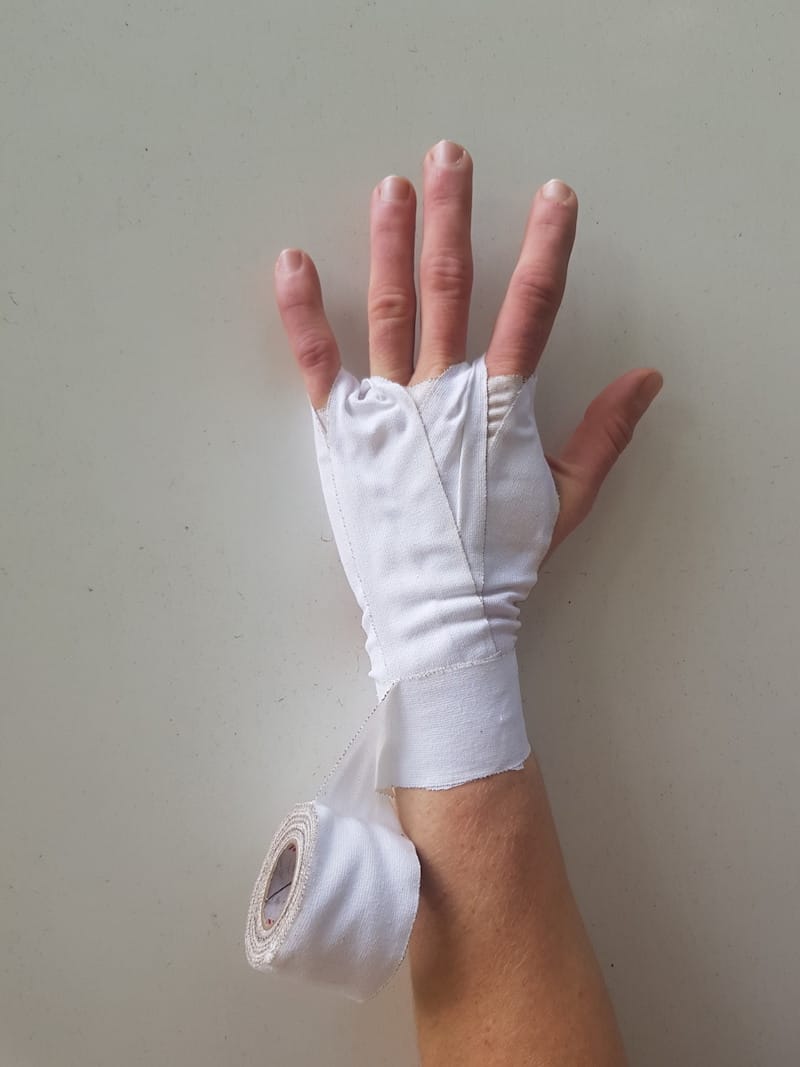
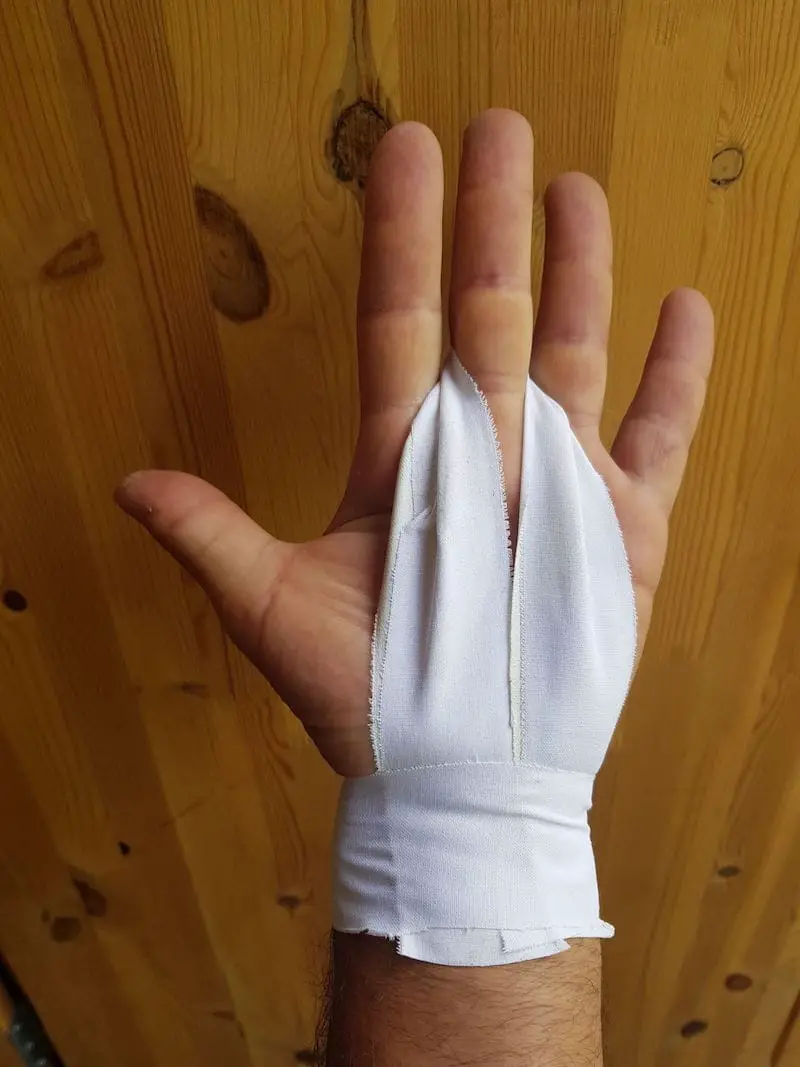
Instructions for making crack jamming gloves:
- Measure a strip of tape across the back of your palm, aligned to the outside edges of your pinkie and index fingers. Cut three strips of equal length, placing them so that they overlap each other by about ⅓ to ½. This sheet should cover the area from your first knuckles to just above your wrist.
(These instructions assume that your tape is 1½” wide. Different widths of tape may require you to apply more or less strips to achieve the same result.)
- Repeat step 1 as many times as you need to feel comfortable in the cracks you’ll be climbing. For thin hands, or to feel maximum contact with the rock, a single layer is best. 2-3 layers will provide more padding, but might also restrict your mobility and make your hand too fat to fit into thinner cracks.
- Now you’ll make two finger loops, one for your index finger and one for the pinkie. Starting about an inch below the sheet of tape, start a line of tape at your wrist, run it up the sheet on the back of your palm, then loop it around your index finger, and run it back down the sheet to meet at the starting point. Do the same for your pinkie. These finger loops should be tight, but not so tight that you can’t move your fingers. The loops will loosen up a bit after a little use; even if they feel a bit stiff initially, they shouldn’t impact your ability to use face holds.

- Tie the glove in place by looping a couple of rings of tape around your wrist at the base of the glove.
- When taking off the gloves for reuse, depending on the tape you used and your practice with the technique, you may be able to just unwind the anchor tape at the base and re-stick it the next day. If that doesn’t work, you can cut it on the inner side of your wrist and apply a new layer of tape next time to keep it in place.

As you can see, making your own tape gloves requires a bit of time/skill. For this reason manufactures have released various pre-made crack climbing gloves.
Check out pro climber Beth Rodden demonstrating this taping method for making jamming gloves:
Taping Climbing Gear
Nuts: around the plastic of the CE markings, just before the clip-in loop.
The official line from Petzl, one of the premier gear manufacturers, is that you shouldn’t mark any of your textile pieces of climbing gear, like slings or harnesses, anywhere but the label or any other non load-bearing point of the gear.
This means that using finger tape to mark your textile gear is not recommended. This is because it’s difficult to say which chemicals have been used in the production of the tape you’re using as a marker, and in particular, in its glue.
Although we’ve never heard of anyone who died because their finger tape ate through the nylon of their gear, there’s no manufacturer statement supporting this practice.
Personally, I’ve taped the slings of my quickdraws with a variety of tapes, as have climbing partners. But the official line is don’t tape textiles. Proceed at your own risk.
As for taping hard goods, like cams, nuts and carabiners, a small ring of finger tape can be a useful way to identify your gear.
Try to find a spot on the hardware that does not impact its use. Picking a location that sees less contact with your hands and the rock will also keep your tape marker in better condition for longer.
Some places you might use finger tape to mark your gear are:
Cams: where the stem connects to the head
Nut tool: About an inch down from the butt
Carabiners: On the spine
Q&A
Do You Tape Your Palm While Rock Climbing?
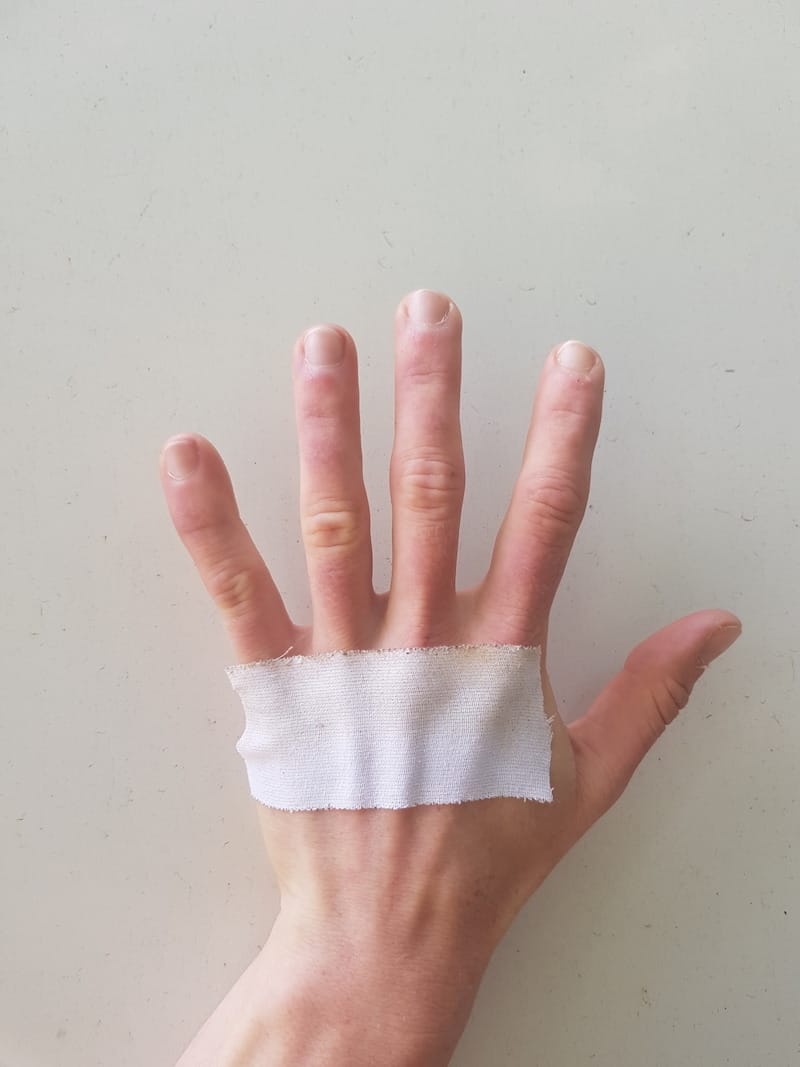
Though not common, you can tape your palm while rock climbing, especially for palm flappers or blisters. To do so:
- First, treat the wound on the inside of your hand. Maybe apply a dab of superglue to keep from ripping it further.
- Take a roll of cloth-based athletic tape, about 1½” wide. Don’t fret the specifics too much for this one; you’re just making a high-tech band-aid that will allow you to continue climbing.
- Measure and cut a length of tape twice the length of your hand, plus about 2”.
- Cut a second, identical length. Put one length of tape over the other. Depending on your preference, you might put the sticky side of both pieces of tape facing in, or leave one side sticky to apply to the inside of your hand. Doubling the tape gives you a thicker, more durable grip.
- Fold your length of tape in half at mid-length. This mid-point will be used to anchor it over a finger.
- Run another strip of tape down the middle of your grip to secure the two sides in place, making sure not to tape over the finger loop.
- Place the loop of tape on the inside of your palm, anchored on your middle finger. You might need to use another finger as an anchor if the wound is too far to either side of your hand. The tape should cover most of the inside of your palm. Both sides should run together down your hand, and continue a little bit down your forearm.
- Tape the ends of the grip securely in place, running a new ring of tape around your wrist.

How to Avoid Finger Injuries While Climbing
The best way to avoid finger injuries while climbing is to warm up property, and not crimping too hard on small holds. By far, the two most common finger injuries in climbing are pulley injuries and tenosynovitis.
Pulley Injuries
As outlined in the finger pulley taping section of this article, pulley injuries generally affect the “A” pulleys of the finger and involve a rupture of the pulley, which holds the tendons to the bone. The pulley tries to hold the force into the finger perpendicular to the direction of an excessive force, as in crimping, and ruptures in the process.
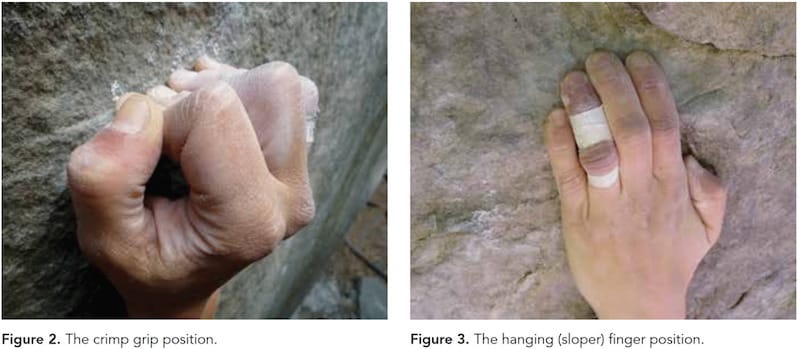
The best thing to do to avoid pulley injuries is to stop crimping! Take holds with an open-handed slope position whenever possible. Crimping puts over double the force on your A2 and A4 pulleys than open-handing holds (Schöffl et al., 2009).
The other most important thing you can do to protect your pulleys is to warm up properly:
[O]ver the first 120 climb-ing moves, the amount of physiological bowstringing of the flexor tendons shows an increase of up to 30% (37). There-fore, climbing about 3-4 routes with 40 moves or 8-12 boulder problems with increasing intensity is recommended as a warm up (71). (Schöffl et al., 2020)
Tenosynovitis
The second most common finger injury, tenosynovitis, is an inflammation of the tendon sheath. This causes pain, and occasionally minor swelling, on the palm-side of the finger.
Tenosynovitis is an overuse injury. It’s most likely to occur if you climb too much or suddenly change your climbing load, like after returning from a break or going on a climbing trip (Schöffl et al., 2020; Simon, 2020).
All it takes to avoid this injury is common sense. Take rest days. Progressively increase your training load in preparation for upcoming goals, rather than massively increasing the duration and intensity of your climbing over a short period. Try to climb efficiently, to offload as much weight as possible to your legs and core rather than overloading your fingers.
What Is the Best Way to Keep Climbing Tape on Your Finger?
The best way to keep climbing t ape on your fingers by taping your fingers with good technique. This should keep your climbing tape should remain in place.
Some types of taping are notorious for moving while climbing, like when taping tips for worn skin, because the thin strip of tape is constantly in contact with the rock.
In these cases, the best you can do is tape properly, make sure to anchor the tape with a loop of tape on the next finger joint, and maybe apply a dab of superglue between the skin and the tape for good luck.
How to Avoid Blisters When Rock Climbing
It is difficult to avoid blisters when climbing when you’re first getting into the sport because you’re skin is not used to the grips yet. With time your body will naturally build up calluses and the problem will take care of itself.
While going through this stage, here’s a few preventative actions to keep in mind:
- Stop climbing sessions when your skin feels raw.
- Wash your hands immediately after finishing your session for the day. Chalk in the creases of your skin keeps it dry and slows healing.
- Avoid moisturizers that have skin softeners in them. That’s most moisturizers. These can often give the impression to quicken your skin’s healing, but it’ll leave you with soft skin that just rips and blisters again the next time you climb.
- Use a quality after-climbing hand care product. Rhino Skin Repair and climbOn are both popular.
- When climbing, once you latch a hold confidently, maintain that hand position rather than wriggling around on the hold and causing extra wear on your skin.

- SOOTHING REPAIRING CREAM: Rhino’s Repair lotion for men and women is designed to heal dry, swollen and abused hands and feet. This hand cream was created with climbers’ needs in mind and is part of Rhino Skin Solutions skin care range. It’s a great solution for anyone who suffers from cracked and damaged hands.
- NON-GREASY NATURAL LOTION: Our climbing lotion is a non-greasy natural solution that soothes and replenishes dry skin. It contains analgesic menthol, nourishing magnesium and essential oils which give a fantastic smell. It comes in an airless bottle which dispenses lotion until it is empty, ensuring there’s no waste.
Can Electrical Tape or Duct Tape Be Used For Rock Climbing?
Electrical tape and duct tape can not be used for rock climbing. Athletic tape is much softer and more flexible, as well as being formulated with glues intended for contact with your skin.
It will stay put much better, and you can be sure the glue will not cause you any harm. What’s more, the texture of athletic tape is much more appropriate for climbing, coming much closer to the grip you might have from direct skin contact on rock, rather than the slippery plastic surface of electrical and duct tapes.
However, for taping your gear, electrical tape and duct tape are fine, and are a popular choice for marking gear.
They may not be recommended for application to climbing textiles, such as harnesses and slings, due to uncertainty over the composition of the glues and the risk that these unknown compounds may have that’ll damage your gear (Petzl, n.d.). That said, walk around any crag and you’ll probably see plenty of gear marked with a variety of tapes.
Which is the best climbing tape to use?
In our opinion, the best climbing tape is the Evolv Magic Climbing Hand Tape. We have a full article reviewing this and many of the other top climbing tapes in the industry
Sources:
Davis, K. P., & Derlet, R. W. (2013). Cyanoacrylate Glues for Wilderness and Remote Travel Medical Care. Wilderness & Environmental Medicine, 24(1), 67-74. (1)
Leggat, P. A., Kedjarune, U., & Smith, D. R. (2004). Toxicity of Cyanoacrylate Adhesives and Their Occupational Impacts for Dental Staff. Industrial Health, 42(1), 207-21.(2)
Lutter, C., & Schöffl, V. (2017). Circular wrist tape – How to correctly use this technique in climbing and bouldering. Sports Orthopaedics and Traumatology, 33(1), 410-413.(3)
Petzl. (n.d.). How can I label or identify a sling?. https://www.petzl.com/INT/en/Sport/FAQ/how-can-i-label-or-identify-a-sling
Saunders, J. (n.d). Tape and Other Catastrophes. Dr. Julian Saunders. (4)
Schöffl, I., Einwag, F., Strecker, W., Hennig, F., & Schöffl, V. (2007). Impact of Taping After Finger Flexor Tendon Pulley Ruptures in Rock Climbers. Journal of Applied Biomechanics, 23(1), 52–62.(5)
Schöffl, I., Oppelt, K., Jüngert , J., Schweizer, A., Neuhuber, W., & Schöffl, V. (2009). The influence of the crimp and slope grip position on the finger pulley system. Journal of Biomechanics, 42(1), 2183-2187. https://www.researchgate.net/figure/A-comparison-between-the-crimp-grip-and-the-slope-grip-positions-with-regard-to-the_fig3_26727009/download
Schöffl, V., Schöffl, I., Frank, L., Küpper, T., Simon, M., & Lutter, C. (2020). Tendon Injuries in the Hands in Rock Climbers: Epidemiology, Anatomy, Biomechanics and Treatment – An Update. Muscles, Ligaments and Tendons Journal, 10(2), 233-243.(6)
Schweizer, A. (2000). Biomechanical effectiveness of taping the A2 pulley in rock climbers. Journal of Hand Surgery, 25 B(1), 102–107. (7)
Simon, A. (2020). Rock Climbing Finger Tenosynovitis.(8)
For more reading check out our article on hand care for climbers.
Editorial staff for The Wandering Climber. An expert roundup of climbing nerds from across the world!